


Page 23 - Series-4 Neon-Flex manual
P. 23
23              Ledpro copyright


      2. RGB Light Wiring

      Note:
      1.   This Neon-Flex must be used in conjunction with DC24V power supply.2.
         Always observe proper polarity. Polarity symbols should match on each component.
      3.  Ensure to add 20% buffer when sizing power supply.
      4.  Ensure that the power cable carried current is no greater than 80% of its capacity.
      5.   To minimize the voltage drop and keep light consistency, position power supply nearest to the power feed end of
            Neon-Flex and keep the power line as short as possible.
      6.   Compatible with RGB controller and DMX control.


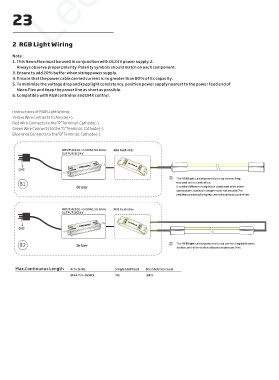
      Instructions of RGB Light Wiring:
      Yellow Wire Connects to Anode(+).
      Red Wire Connects to the“R”Terminal, Cathode(-).
      Green Wire Connects to the "G”Terminal, Cathode(-).
      Blue Wire Connects to the“B”Terminal, Cathode(-).


                           INPUT:AC100~240VAC,50-60Hz  RGB Controller
                           OUTPUT:DC24V
                                         OUT PUT       DC+          DC-  DC+          DC-  DC+          DC-  IN PUT DC24V  IN PUT DC24V  IN PUT DC24V  LED
                                         OUT PUT
                                         OUT PUT
                                         DC24V
                                         DC24V
                                   POWER SUPPLY  DC24V
                                                            W   W    NC    V+
                                                            W   W    NC    V+
                                   POWER SUPPLY
                                   POWER SUPPLY
                                                        LED CONTROLLER
                                                        LED CONTROLLER
                                                        LED CONTROLLER
                               IN PUT
                               IN PUT
                               IN PUT                       OUT  PUT  OUT  PUT  OUT  PUT  W   W    NC    V+
         GND                   AC100-240V
                               AC100-240V
                               AC100-240V
                                                                         ①  The RGB light can be powered on by connecting
         B1                                                                 one end to the controller.
                                  Driver                                    It can be different lengths or combined with other
                                                                            connectors, but each length must not exceed 7m
                                                                            and the combined lengths cannot overload controller.
                           INPUT:AC100~240VAC,50-60Hz  RGB Controller
                           OUTPUT:DC24V
                                         OUT PUT       DC+          DC-  DC+          DC-  DC+          DC-  IN PUT DC24V  IN PUT DC24V  IN PUT DC24V  LED
                                         OUT PUT
                                         OUT PUT
                                         DC24V
                                         DC24V
                                   POWER SUPPLY
                                   POWER SUPPLY
                                                            W   W    NC    V+
                                   POWER SUPPLY  DC24V
                                                            W   W    NC    V+
                                                        LED CONTROLLER
                                                        LED CONTROLLER
                                                        LED CONTROLLER
                               IN PUT
                               IN PUT
                               IN PUT                       OUT  PUT  OUT  PUT  OUT  PUT  W   W    NC    V+
         GND                   AC100-240V
                               AC100-240V
                               AC100-240V
                                                                         ②  The RGB light can be powered on by connecting both ends
         B2                       Driver
                                                                             to the controller within allowed maximum 14m.
        Max.Continuous Length  Article No.        Single End Feed  Double Ends Feed
                               NFS4-Pro-D24CC     7m            14m

